

Nikon India Private Ltd. has announced the launch of “Through Her Lens”, Season 4, a contest dedicated to recognise and celebrate the immense contribution of women in photography. The contest will remain open for submissions until March 31, 2025, inviting both women professionals and enthusiasts to participate and showcase their unique perspectives and creative … [Read more...]
Nikon Unveils NIKKOR Z 35mm f/1.2 S lens
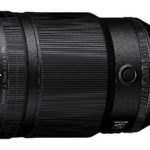
Nikon India Pvt. Ltd., announces the launch of the NIKKOR Z 35mm f/1.2 S, a high-performance wide-angle prime lens that sets new standards in optical excellence. Engineered to deliver breathtaking quality, this fast f/1.2 aperture lens ensures exceptional detail and depth, making it an ideal choice for still photography and videography. The NIKKOR Z 35mm f/1.2 S comes … [Read more...]
DJI Unveils Osmo Pocket 3

The 3rd generation Osmo Pocket is a three-axis handheld gimbal. The big change in the latest version is a significantly improved camera, a larger sensor, in addition to a longer-lasting battery and a much bigger touchscreen that now rotates between portrait and landscape modes. It is considerably more expensive than past Pockets. Three-Axis Stabilization ensures smooth … [Read more...]
ISO ‘Invariance’

Huh? What’s that? Never heard of it? That’s okay. First, let me say right here, that this is not an easy topic to explain but at the same time, it is important. Some cameras today are ISO Invariant or close to ISO Invariant. So what does that mean? Note: 1) In trying to over-simplify things, some of the explanations may not be 100% technically correct. 2) Pictures must … [Read more...]
How to Select and Darken Sky like a Pro

We often wish to darken the sky in a landscape photograph – only the sky. Sometimes, we can accomplish this by selecting the sky using a simple tool like the Magic Wand or the Quick Selection Tool and then with the sky selected, we merely use Levels or Curves to darken the selected area. Things get difficult however, if there are projections rising into the sky (like trees) and … [Read more...]
